Final Product What You'll Be Creating
A Word From the Author
Even though there are a few trillion options to choose from, WordPress has comfortably taken the crown as the king of CMSs and blogging platforms with its incredible flexibility. A shortcode is one of those features that ratchet up the user friendliness of the system.However, most implementations still require you to remember the shortcode itself. When you’ve created a masterpiece of a theme, the usability shouldn’t really lag behind. I’ll show you how to create shortcodes and then integrate it with the editor itself, so the user doesn’t have to go poring through your docs just to remember the correct syntax to embed a button. Intrigued? Let’s get started right away!
What Are These Shortco-whamathingies?
It’s called a shortcode and it has been part of the base WordPress installation since it hit version 2.5. Basically, these are similar to the bbcodes used on popular message board software: lightweight markup used to format content.Here, you can define your own codes to use within your theme. Unlike BBCodes, though, shortcodes are primarily used to shield the user from tedious markup and possible errors. By using a shortcode, for say, a button, the user doesn’t have to remember the complicated markup that needs to be input to create the button. Overall, it’s quite a boost to a theme’s usability and possibly, noob friendliness.
ShortCode Variations
If you’re unfamiliar with the concept of a BBCode, and by extension, shortcode, this is how the simplest version looks:[my-gallery]
If you’ve ever embedded a gallery with WordPress, you’ve already used a shortcode!
There are two more variations you should also be familiar with.
[button]Content[/button]
[link to="www.net.tutsplus.com"]NetTuts+[link]
We’ll implement each of these variations first before moving onto other, busier things.
Each shortcode implementation requires a two-step process:
- 1: Create the primary handler method
- 2: Hook up the handler to WordPress
Take 1: Replacing Strings
We’ll first learn how to implement the simplest shortcode possible. As a use case, let’s say you end each post with some common signing off text. Copying and pasting might be a simple approach, but you may feel like a luddite doing so. Let’s fix this with some WP niftiness!Unless otherwise noted, all of the code below goes into functions.php
Step 1: Create the Primary Function
The primary function takes care of the core logic of your shortcode. We’ll need to create this first before proceeding.Step 2: Hook into WordPress
The next step, as you may assume, is to hook into the WordPress system to associate the shortcode with this text. This is done using theadd_shortcode method. add_shortcode('signoff', 'signOffText');
Yes, a single one-liner is all it takes. The first parameter defines the shortcode you’ll be using in the editor, while the the second points to the function we created a moment or so ago.
Note: The
add_shortcode method always comes after the handler method.That should do it. Just type
[signoff] into your editor and WordPress will dynamically replace the text as needed.Take 2: Wrapping Content
Next up, we’re going to take a look at another variation: wrapping some content with some markup. You’dhave to use it like so:
[quote]Some text[/quote]
Step 1: Create the Primary Function
The primary function has to be modified a little here. We’re noting that our function receives two parameters: attributes through theatts variable and the content itself through the content variable.The next step is simply to return the markup wrapped around the selected text.
Step 2: Hook into WordPress
This step remains the same:Take 3: Adding Attributes
Finally, we’re going to take a look at adding attributes to the mix as well. You’d have to use it like so:Step 1: Create the Primary Function
The primary function needs to be refactored to handle all the new functionalities we’re bringing in. First up, we merge the attributes passed in with the shortcode and the attributes we’re expecting.The final step, as always, is simply to return the markup we want after filling it up appropriately. Here, I’ve used the data sent with the shortcode to fill in the anchor’s
href attribute as well as content. Step 2: Hook into WordPress
This step remains unchanged, but essential. Remember, without this, WordPress has no what to do with the shortcode.Kicking Everything Up a Notch
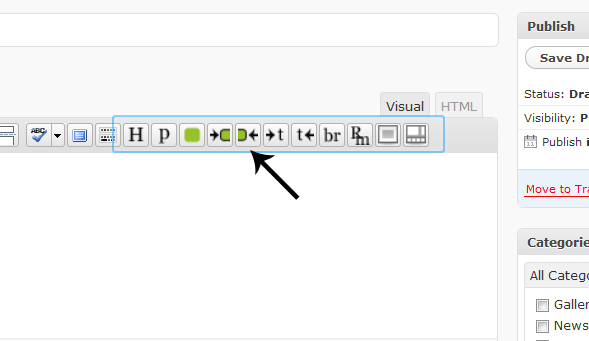
This is where you’d expect this tutorial to end but no, you’ve guessed wrong. As I mentioned earlier, shortcodes take away a lot of pain, but there are few gotchas. For one, the user has to remember the shortcodes he has at his disposal to make meaningful use of them.If you have just a couple, it’s all good, but with feature laden themes, remembering each one becomes a chore. To rectify this, we’re going to add buttons directly to the TinyMCE interface, so the user can simply click on the button to get it all done.
As an example, I’m going to teach you how to add the second variation to the editor. I’m hoping you can extrapolate this information for the specific functionality you have in mind.
Step 1: Hook into WordPress
The first step in the process is hooking into WordPress and adding our initialization code. The following snippet takes care of that. Remember, all of this needs to be in yourfunctions.php file.add_button when the page is initially loaded. add_action is our hook into WordPress’ internals.Step 2: Create Our Initialization Function
Once that’s done, we hook up two of our [to be written] functions to specific filters. Both of these actually hook into TinyMCE’s front end architecture through WordPress. The first is executed when the editor loads the plugins while the second is run when the buttons are about to be loaded.
In the example above, we proceed regardless of which mode the editor is in. If you want to display it only when the editor is in, say, visual mode, you’ll need to perform a quick check. If
get_user_option('rich_editing') evaluates to true,
you’re in visual mode. Otherwise, HTML mode. I typically tend to add
these buttons only under visual mode but feel free to mix and match
here. Step 3: Register Our Button
Step 4: Register Our TinyMCE Plugin
function add_plugin($plugin_array) {
$plugin_array['quote'] = get_bloginfo('template_url').'/js/customcodes.js';
return $plugin_array;
}
The snippet above lets TinyMCE, and WordPress, know how to handle this button. Here, we map our quote shortcode to a specific JavaScript file. We use the get_bloginfo method to get the path to the current template. For the sake of organization, I’m keeping my tinyMCE plugin along with my other JS files.
Step 5: Write the TinyMCE Plugin
Now onto the final portion of our endeavour. Remember, the following code goes into a file called customcodes.js placed in the JS directory of your theme. If you thought it went into functions.php like all the code above, no cookie for you!First order of the day is a quick closure to keep from polluting the global namespace. Inside, we call the
create
method to create a new plugin passing in the name and other assorted
attributes. For the sake of brevity, I’m just going to call my plugin quote.Once inside, we define the
init function that’s executed upon initialization. ed points to the instance of the editor while url points to the URL of the plugin code.Most of the attributes should be fairly self explanatory. Note that the image you pass in is relative to the parent folder of the JS file that holds the code. Here it’d be theme directory/js.
Next up, we create the event handler for this button through the
onclick function. The one-liner it contains essentially gets the selected text, if any, and wraps it with out shortcode. setContent and getContent are helper methods provided by tinyMCE to manipulate the selected text.Finally, in the last line, we add the freshly created plugin to tinyMCE’s plugin manager. Pay attention to the names you’re using in each step. It’s error prone if you’re not paying attention. And that’s about it! We’re done! Load up the editor and make sure your spiffy new button is working.
Conclusion
And there you have it. We’ve successfully integrated shortcodes into a WordPress theme in a very user friendly manner. Hopefully you’ve found this tutorial to be of help. Feel free to reuse this code elsewhere in your projects and chime in within the comments if you need any assistance.Questions? Nice things to say? Criticisms? Hit the comments section and leave me a comment. Happy coding and thank you so much for reading!


0 comments:
Post a Comment
I am a student of MS(CS), and also a computer software engineer and web developer.