One of the primary reasons why WordPress is the most popular CMS
platform available is the sheer level of customizability that it brings
to the table. Today, we’ll review the process of integrating one of
those popular features, shortcodes, in the most user friendly way possible, into our theme.
A Word From the Author
Even though there are a few trillion options to choose from,
WordPress has comfortably taken the crown as the king of CMSs and
blogging platforms with its incredible flexibility. A shortcode is one
of those features that ratchet up the user friendliness of the system.
However, most implementations still require you to remember the
shortcode itself. When you’ve created a masterpiece of a theme, the
usability shouldn’t really lag behind. I’ll show you how to create
shortcodes and then integrate it with the editor itself, so the user
doesn’t have to go poring through your docs just to remember the correct
syntax to embed a button. Intrigued? Let’s get started right away!
What Are These Shortco-whamathingies?
It’s called a shortcode and it has been part of the base WordPress installation since it hit version 2.5. Basically, these are similar to the bbcodes used on popular message board software: lightweight markup used to format content.
Here, you can define your own codes to use within your theme. Unlike
BBCodes, though, shortcodes are primarily used to shield the user from
tedious markup and possible errors. By using a shortcode, for say, a
button, the user doesn’t have to remember the complicated markup that
needs to be input to create the button. Overall, it’s quite a boost to a
theme’s usability and possibly, noob friendliness.
ShortCode Variations
If you’re unfamiliar with the concept of a BBCode, and by extension, shortcode, this is how the simplest version looks:
[my-gallery]
If you’ve ever embedded a gallery with WordPress, you’ve already used a shortcode!
There are two more variations you should also be familiar with.
[button]Content[/button]
[link to="www.net.tutsplus.com"]NetTuts+[link]
We’ll implement each of these variations first before moving onto other, busier things.
Each shortcode implementation requires a two-step process:
1: Create the primary handler method
2: Hook up the handler to WordPress
Regardless of the complexity of the shortcode, the core steps remain the same.
Take 1: Replacing Strings
We’ll first learn how to implement the simplest shortcode possible.
As a use case, let’s say you end each post with some common signing off
text. Copying and pasting might be a simple approach, but you may feel
like a luddite doing so. Let’s fix this with some WP niftiness!
Unless otherwise noted, all of the code below goes into functions.php
Step 1: Create the Primary Function
The primary function takes care of the core logic of your shortcode. We’ll need to create this first before proceeding.
function signOffText() { return 'Thank you so much for reading! And remember to subscribe to our RSS feed. '; }
Step 2: Hook into WordPress
The next step, as you may assume, is to hook into the WordPress
system to associate the shortcode with this text. This is done using the
add_shortcode method.
add_shortcode('signoff', 'signOffText');
Yes, a single one-liner is all it takes. The first parameter defines
the shortcode you’ll be using in the editor, while the the second points
to the function we created a moment or so ago. Note: The add_shortcode method always comes after the handler method.
That should do it. Just type [signoff] into your editor and WordPress will dynamically replace the text as needed.
Take 2: Wrapping Content
Next up, we’re going to take a look at another variation: wrapping some content with some markup. You’d
have to use it like so:
[quote]Some text[/quote]
Step 1: Create the Primary Function
The primary function has to be modified a little here. We’re noting
that our function receives two parameters: attributes through the atts variable and the content itself through the content variable.
The next step is simply to return the markup wrapped around the selected text.
function quote( $atts, $content = null ) { return '
"'.$content.'"
'; }
Step 2: Hook into WordPress
This step remains the same:
add_shortcode("quote", "quote");
I like to name my shortcodes exactly the same as the primary
functions unless the naming gets unwieldy. You may have your own styles
so feel free to change the naming scheme. There’s no accepted best
practice.
Take 3: Adding Attributes
Finally, we’re going to take a look at adding attributes to the mix as well. You’d have to use it like so:
[link to="www.net.tutsplus.com"]NetTuts+[link]
Step 1: Create the Primary Function
The primary function needs to be refactored to handle all the new
functionalities we’re bringing in. First up, we merge the attributes
passed in with the shortcode and the attributes we’re expecting.
The final step, as always, is simply to return the markup we want
after filling it up appropriately. Here, I’ve used the data sent with
the shortcode to fill in the anchor’s href attribute as well as content.
This step remains unchanged, but essential. Remember, without this, WordPress has no what to do with the shortcode.
add_shortcode("link", "link");
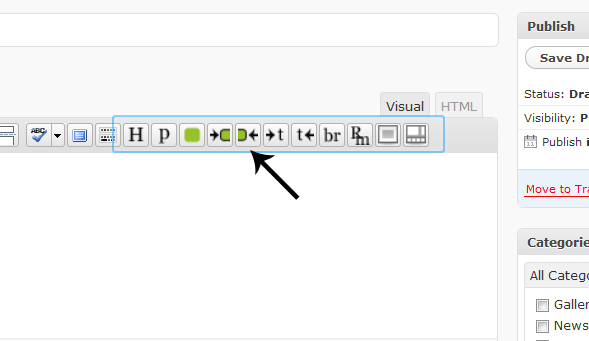
Kicking Everything Up a Notch
This is where you’d expect this tutorial to end but no, you’ve
guessed wrong. As I mentioned earlier, shortcodes take away a lot of
pain, but there are few gotchas. For one, the user has to remember the
shortcodes he has at his disposal to make meaningful use of them.
If you have just a couple, it’s all good, but with feature laden
themes, remembering each one becomes a chore. To rectify this, we’re
going to add buttons directly to the TinyMCE interface, so the user can
simply click on the button to get it all done.
As an example, I’m going to teach you how to add the second variation
to the editor. I’m hoping you can extrapolate this information for the
specific functionality you have in mind.
Step 1: Hook into WordPress
The first step in the process is hooking into WordPress and adding
our initialization code. The following snippet takes care of that.
Remember, all of this needs to be in your functions.php file.
add_action('init', 'add_button');
We’re asking WordPress to run the function called add_button when the page is initially loaded. add_action is our hook into WordPress’ internals.
Step 2: Create Our Initialization Function
function add_button() { if ( current_user_can('edit_posts') && current_user_can('edit_pages') ) { add_filter('mce_external_plugins', 'add_plugin'); add_filter('mce_buttons', 'register_button'); } }
This tiny snippet of code will be executed when the page loads.
Above, we’re checking whether the user has the necessary authorization
to edit a page or a post before proceeding.
Once that’s done, we hook up two of our [to be written] functions to
specific filters. Both of these actually hook into TinyMCE’s front end
architecture through WordPress. The first is executed when the editor
loads the plugins while the second is run when the buttons are about to
be loaded.
In the example above, we proceed regardless of which mode the editor
is in. If you want to display it only when the editor is in, say, visual
mode, you’ll need to perform a quick check. If get_user_option('rich_editing') evaluates to true,
you’re in visual mode. Otherwise, HTML mode. I typically tend to add
these buttons only under visual mode but feel free to mix and match
here.
Step 3: Register Our Button
function register_button($buttons) { array_push($buttons, "quote"); return $buttons; }
The function merely adds our shortcode to the array of buttons. You
can also add a divider between your new button and the previous buttons
by passing in a | before.
Step 4: Register Our TinyMCE Plugin
function add_plugin($plugin_array) { $plugin_array['quote'] = get_bloginfo('template_url').'/js/customcodes.js'; return $plugin_array; }
The snippet above lets TinyMCE, and WordPress, know how to handle this button. Here, we map our quote shortcode to a specific JavaScript file. We use the get_bloginfo method
to get the path to the current template. For the sake of organization,
I’m keeping my tinyMCE plugin along with my other JS files.
Step 5: Write the TinyMCE Plugin
Now onto the final portion of our endeavour. Remember, the following code goes into a file called customcodes.js placed in the JS directory of your theme. If you thought it went into functions.php like all the code above, no cookie for you!
Looks a little complex but I assure you, it’s anything but. Let’s
break it down into smaller section to make it easier for us to parse. First order of the day is a quick closure to keep from polluting the global namespace. Inside, we call the create
method to create a new plugin passing in the name and other assorted
attributes. For the sake of brevity, I’m just going to call my plugin quote.
Once inside, we define the init function that’s executed upon initialization. ed points to the instance of the editor while url points to the URL of the plugin code.
Most of the attributes should be fairly self explanatory. Note that
the image you pass in is relative to the parent folder of the JS file
that holds the code. Here it’d be theme directory/js. Next up, we create the event handler for this button through the onclick function. The one-liner it contains essentially gets the selected text, if any, and wraps it with out shortcode. setContent and getContent are helper methods provided by tinyMCE to manipulate the selected text. Finally, in the last line, we add the freshly
created plugin to tinyMCE’s plugin manager. Pay attention to the names
you’re using in each step. It’s error prone if you’re not paying
attention. And that’s about it! We’re done! Load up the editor and make
sure your spiffy new button is working.
Conclusion
And there you have it. We’ve successfully integrated shortcodes into a
WordPress theme in a very user friendly manner. Hopefully you’ve found
this tutorial to be of help. Feel free to reuse this code elsewhere in
your projects and chime in within the comments if you need any
assistance.
Questions? Nice things to say? Criticisms? Hit the comments section
and leave me a comment. Happy coding and thank you so much for reading!
Have you ever been frustrating, why e-mail is not going from the localhost while using XAMPP or WAMP or any other PHP servers in windows environment? well in that situation i think i can help you.In this article i am going to tell you how to send e-mail from localhost in PHP.
1) Open the “php.ini“. You should know where it is located because it depends upon the particular server you’re running.
2) Search for the attribute called “SMTP” in the php.ini file.Generally you can find the line “SMTP=localhost“. change the localhost to the smtp server name of your ISP. And, there is another attribute called “smtp_port” which should be set to 25.I’ve set the following values in my php.ini file.
SMTP = smtp.wlink.com.np smtp_port = 25
3) Restart the apache server so that PHP modules and attributes will be reloaded. 4) Now try to send the mail using the mail() function ,
you might get the warning like this, Warning: mail() [function.mail]: “sendmail_from” not set in php.ini or custom “From:” header missing in C:\Program Files\xampp\htdocs\testmail.php on line 1 5) Now specify the following headers and try to send the mail again,
Well that’s all, the mail is sent to “you@yourdomain.com” from the localhost.
Note : Some
smtp server verifies the email address of the sender so the email
address which is in the place of “sender@sender.com” should be a valid and existing email address otherwise mail might not be sent to the “you@yourdomain.com”.
Hey
guys. Quick post for you today. So by now, chances are you’ve had an
opportunity to play around with jQuery 1.5 (and 1.5.1) and you may have
even checked out some of the great new Deferred features that that
release came with. Today I wanted to share an offline learning pack for
anyone interested in tweaking their jQuery skills offline.
What
does this learning pack come with? Well, for starters it will include
printable reference sheets so that whenever you’re wondering what
selector or method might be best to use, you’ll have access to material
that can assist with that. The pack also comes with all the 1.5.1
documentation in an easily browseable offline format (with all our API
examples included) and a chrome extension allowing you to easily search
the API offline while you code.
I’m also actively recommending all
beginner and intermediate developers read Rebecca Murphey’s excellent
jQuery Fundamentals book as it’s a wonderful starting point for
increasing your knowledge and skills with both jQuery and JavaScript in
general. You’ll find exercises for this included under her subfolder. The 1.5.1 Offline Learning Kit Includes
Selectors Printable that explains what each selector does and how it should be used (PDF)
Woork jQuery 1.5 Printable Cheatsheet showing all the different methods supported by 1.5 (PDF)
The jQAPI 1.5 Offline Documentation pack that lets you browse the documentation and API examples on your desktop
jQuery 1.5 VSDocs for Visual Studio users
Rebecca Murphy’s excellent jQuery Fundamentals book and exercises (pack)
jQuery 1.5.1 Offline API Browser extension for Google Chrome
For
record purposes, if you’re interested in picking up the 1.4.3 kit from
last year, I’m going to leave it up below. The main difference between
the kits (other than versioning) is that this older kit also came with
tutorials and sample code for building mobile applications. If you’d
like to grab this pack, remember to update to 1.5 and the latest version
of jQuery mobile if you want to keep playing around with the examples. The 1.4.3 Offline Learning Kit Includes
If
you’re looking to start working with jQuery Mobile, it can be nice to
have a minimalist example at your fingertips to start off with. That’s
why this pack also includes a jQuery Mobile demo application – one for
PHP developers and another for Rails developers. I’ve noticed quite a
few apps utilize these for their jQuery mobile app-setup so this should
hopefully give you an idea of how to get started.
My 1.4.3 Selectors Printable that explains what each selector does and how it should be used (PDF)
The FutureColours 1.4.3 Cheatsheet showing all the different methods supported by 1.4.3 (PDF)
The jQAPI
1.4.3 Offline Documentation pack that lets you browse the documentation
and API examples on your desktop (thanks to the guys at yayQuery and
the awesome Ben Alman)
A Complete Developer’s jQuery 1.4.3 Mobile Demo Application (PHP courtesy of DevGrow, Rails courtesy Fuel)
Rebecca Murphy’s excellent jQuery Fundamentals book and exercises (PDF)
PHP is probably the most popular web development language right now. At least 20 million domains
use PHP and it’s the language used on major sites such as Wikipedia
and Facebook as well as in some of the world’s biggest open source
projects like WordPress and Drupal.
In this article, I’ll share with you ten things I wish I was told
when I was just getting started with PHP development, and I’m hoping
you’ll be able to learn a thing or two if you’re just taking your first
steps into this awesome web development language.
1. Use PHP Core Functions and Classes
If you’re trying to do something that seems fairly common, chances
are, there’s already a PHP function or class that you can take advantage
of. Always check out the PHP manual
before creating your own functions. There’s no need to create a
function to remove the white space at the beginning and at the end of a
string when you can just use the trim() function. Why build an XML parser for RSS feeds when you can take advantage of PHP’s XML Parser functions (such as xml_parse_into_struct)?
2. Create a Configuration File
Instead of having your database connection settings scattered
everywhere, why not just create one master file that contains its
settings, and then include it in your PHP scripts? If you need to
change details later on, you can do it in one file instead of several
files. This is also very useful when you need to use other constants
and functions throughout multiple scripts.
Using a config file is a popular web application pattern that makes your code more modular and easier to maintain.
3. Always Sanitize Data That Will Go into Your Database
SQL injections
are more common that you may think, and unless you want a big headache
later on, sanitizing your database inputs is the only way to get rid
of the problem. The first thing you should do is learn about popular
ways your app can be compromised and get a good understanding of what
SQL injections are; read about examples of SQL injection attacks and check out this SQL injection cheat sheet.
Luckily, there’s a PHP function that can help make a big heap of the problem go away: mysql_real_escape_string. mysql_real_escape_string will take a regular string (learn about data types through this PHP variables guide) and sanitize it for you. If you use the function together with htmlspecialchars, which converts reserved HTML characters (like
A few weeks ago we published a collection of jQuery plugins for working with forms.
While those plugins can be very useful, there may be times where you
would rather learn how to code the solution yourself rather than simply
using a plugin. There are a number of quality tutorials available for
working with jQuery and forms, and in this post we will feature 25 of
them.
Summary: jQuery is emerging as the JavaScript library of choice for developers looking
to ease their creation of dynamic Rich Internet Applications. As browser-based
applications continue to replace desktop applications, the use of these libraries will
only continue to grow
Introduction
jQuery has distanced itself from other JavaScript
library options to
become the library of choice for Web developers and is
fast becoming the first choice for programmers looking to ease their
client-side development and create Rich Internet
Applications (RIA) quickly and efficiently. As the use of RIA becomes
ever-more prevalent in the world, the use of JavaScript libraries to
assist in their development will continue to increase as
well. RIAs are defined (loosely) as applications run through the
browser that use a combination of CSS/JavaScript/Ajax to create the
appearance of working on a desktop application. The
latest features being
added to recent releases of Firefox, Internet Explorer,
Safari, and the recent release of Google's new Chrome browser, are
focused on beefing
up the speed of each browser's internal JavaScript engine
for the sole purpose of
making it more conducive to the type of RIAs that the
browser makers picture us
using in the near future.
These companies envision Web pages that contain tens of
thousands of lines of JavaScript code, making the importance of a mature
and bug-free library from which to start all the more crucial.
So, as the future of Web applications moves toward
these rich and immersive interfaces, Web developers increasingly turn to
tools to ease that work. There are several JavaScript libraries out
there in
the world right now, each with its own strengths and
weaknesses and its own fanboys and critics. I'm not here to debate
which one is better than the other as far as features, because
ultimately it
doesn't really matter. Ultimately, what matters most is
what library is
getting used more than the others—volume matters. Take a
look at the Google Trends graph of the four most
popular JavaScript
libraries below. It is apparent that over the past six to
eight months, jQuery has become the dominant choice for JavaScript
libraries and is growing rapidly.
Figure 1. Google Trends of common
JavaScript libraries
The job market is also showing the emergence of jQuery
as the JavaScript
library of choice. A non-scientific look at
Monster.com shows there are 113 jobs with "jQuery" listed, and only 67,
19, and 13
jobs listed for YUI, ExtJS, and mootools, respectively.
This first article in this jQuery series begins by
exploring the syntax
of jQuery, how it is set up, and how its functions are
called. Later
sections in this article explore the core functions in
the
library and how it uses its powerful selectors and
filters to make DOM
traversal easy and straightforward. Later articles will
address CSS manipulation, form control, text changes, Ajax simplicity,
and animations (everyone's favorite eye candy). One of
the most
interesting features of jQuery is its plug-in
architecture, allowing many developers to add on to the functionality of
jQuery. The final
article will introduce you to many of the powerful
plug-ins available to complete your RIA development process.
This series of articles is intended for people who
have prior knowledge of JavaScript syntax, CSS syntax, and DOM syntax.
If you need a refresher on this syntax before reading the
articles in this series, I highly recommend the W3Schools
links in the Resources section of this article.
The basics
Before getting into the fun stuff with jQuery, we need to get the basics
out of the way—how to install it, get it started, and so
on. Start by downloading the jQuery library provided
in the Downloads section, and link to it like you would any other external JavaScript file:
Because jQuery calls or manipulates the DOM objects,
you would run into
problems if you were manipulating these objects in
JavaScript code immediately, before the document finished loading
all the elements on the page. Conversely, you also don't
want to have to
wait until everything on the page has loaded—all
the images, banner ads, analytic code, and YouTube video
previews— before you can call jQuery code.
Appropriately,
a middle ground allows you to call jQuery code in a
safe and error-free manner once the document has finished loading all
the elements on the page, but before all the image,
linking, and rendering
is complete. To stress this again in a different way,
all of your jQuery code needs to be in this function on a page, or in
its
own function. Do not put jQuery code in a JavaScript
code section if it's not in a function.
// Incorrect
// Correct
$(document).ready(function(){
$("div").addClass("a");
});
// - or -
$(document).ready(function(){
myAddClass();
});
function myAddClass()
{
$("div").addClass("a");
}
Also, one additional helpful note: You can have as
many document.ready() functions as you need on one page, and they will
be called in succession. This is a good thing to
keep in mind if you are building your pages dynamically
with modules, and
each module has its own supporting jQuery code (for
example, a PHP page constructed of many smaller PHP page snippets).
One of the most interesting features of jQuery is
its "chainability", its ability to put together a series of functions in
order to improve readability and ease coding. Almost every
jQuery function returns a jQuery object, meaning you
can simply call additional functions on it over and over again to chain
together a complete jQuery command. I compare this to the String class
in Java, in which several functions return a String
object, allowing you to chain together multiple functions on one line:
String man = new String("manipulated").toUpperCase().substring(0,5).toLowerCase();

$("div").addClass("a").show().text("manipulated");
Finally, the last thing to remember when working
with jQuery, or any
JavaScript library, is that they don't always work
well with each
other. In other words, when working with two or more
libraries,
the variable "$" is used by more than one library,
meaning the engine won't know which library should be referenced with a
"$" call. A perfect example of this is the CakePHP library, which
includes
prototype.js built in. Attempting to use jQuery on
these pages will result in errors unless corrected. To get around this
problem, jQuery provides a way to map the "$" variable to a different
variable, for example:
Selection
The root of all jQuery is its ability to select
certain elements on a page and manipulate them. In a sense, these are
the objects around which the jQuery library is built to function.
So, with the numerous options available on a normal
HTML page, you need a way to quickly and efficiently select the elements
you wish to work with on the page, selecting only
those you want (no more and no less). Expectedly,
jQuery provides
powerful selection methods that allow you to find and
select objects on
the page. jQuery has created its own syntax
for selection, and it is quite easy to learn.
(Many of the examples below use functions I won't get into until the
next article, but they should be straightforward enough to understand what they are trying to do.)
At its root, the selection process in jQuery is
really a giant filter process, whereby every element on the page is put
through the filter you supply in your command, and it returns
either the single matching object itself, or an Array
of matching objects, from which you can traverse.
The first three examples are probably the most commonly used. They are finding objects by HTML tag, by ID, or by CLASS.
HTML
To get an array of all the matching HTML elements in
a page, you can simply pass the HTML tag itself, without the braces,
into the jQuery search field. This is the "quick and dirty" way of
finding
objects and is useful for attaching attributes to
generic HTML elements.
, not the first matching, or the last matching.
// Traversing Arrays is discussed later in the article.
$("div").show();
// This will give a red background to every tag in the page.
$("p").css("background", "#ff0000");
ID
Proper page design calls for every ID on a page to
be unique, though this is sometimes broken (intentionally or
unintentionally). jQuery only returns the first matching
element when using the ID selection, because it expects
you to follow proper page design. If you need to attach a tag to
several elements on the same page, the CLASS tag is the proper choice.
// This will set the innerHTML of a span element with the id of "sampleText" to "Hi".
// Note the initial "#" in the command.  This is the syntax used by jQuery to search
// for IDs, and must be included.  If it is excluded, jQuery will search for the HTML
// tag instead, and with no  tags on a page, will ultimately do
// nothing, leading to frustrating and hard-to-find bugs (not that that has ever
// happened to me of course).

$("#sampleText").html("Hi");
CLASS
Classes are a lot like IDs, except that they can be
used for one or many elements on a page. Thus, while you are limited by
having only one element per ID on a page, you can have
many elements with the same CLASS on a page. This
results in giving you
the leeway to perform functions across wide-ranging
elements on a page
while passing in only one CLASS name.
// This will create a red background on every element on the page with a CLASS of
// "redBack".  Notice that it doesn't matter which HTML element this "redBack"
// CLASS tag is attached to.  Also notice the period in the front of the query
//  term -- this is the jQuery syntax for finding the CLASS names.

$(".redBack").css("background", "#ff0000");


This is a paragraph

This is a big div
Sample table
Combining search criteria
The above three search criteria, and all of the
filters presented below, can be combined in a search. By separating
search criteria with a ",", the search will return a
union of all matches of the search terms.
Further filters
While those are certainly the three most commonly used
search parameters in jQuery, there are many others that can help you
quickly find the elements you are looking for on a page.
These further filters all start with a ":" to denote that
they are the filters in the jQuery search term. Though they can stand
alone as search criteria, they are designed primarily
to be used with the three search criteria provided above,
to allow you to fine tune search criteria to find the specific element
you are looking for.
// This will hide every  tag on a page
$("p").hide();

// This will hide the first element on a page, no matter its HTML tag
$(":first").hide();

// Notice how these can be used in combination to provide more fine tuning of
// search criteria.  This will hide only the first

 tag on a given page.
$("p:first").hide();
Multiple filters can be used as search elements, and
though I won't list them all here (that's what an API page is for after
all), some of them are very handy in working with pages
and searching for elements.
I will spend more time on some very important filters in the
Selection package, and that is the form element
filters. Rich Internet
Applications today seem to focus on the form and
its contained elements (text fields, buttons, check boxes,
radio buttons, and so on) that gather and transmit
information to and from the server. Because of their importance in
RIAs,
these filters have a particular importance in working with
jQuery in today's types of Web applications.
These filters work like the other filters introduced in
this article and are preceded with a ":" character to denote they are a
filter. Also, they can be used in combination with other
search filters to provide more refining. So, a search
filter of ":text"
will return every text field on a page, while a search
filter of ".largeFont:text" will return only the text fields on a
page that are part of the "largeFont" class. This will
allow for further
refinement and manipulation of form elements.
The form filters also include individual attributes of
the elements as well, things that might be appropriate and good to know
for developers. So, things like ":checked", ":disabled", and
":selected"
will further refine the search criteria for a given
search.
Traversal
Now that you've learned how to search and filter all of the elements on a
page, you need an efficient way to traverse over the results and take actions on these elements. Not
surprisingly, jQuery offers several ways of traversing over the results of these searches.
The first and most commonly used traversal technique is
the each() function. This is programmatically the same as a "for
loop", looping through each of the elements and incrementing the
element with each iteration. Additionally, a reference to
each element in the loop can be made with "this" (for using regular
JavaScript syntax) or $(this) (for use in jQuery commands).
Take a look at the following example.
// Will loop through each  tag on the page.  Notice the use of the
// inline function here -- this is analogous with the anonymous classes in Java.
// You can either call a separate function, or write an inline function like this.

var increment = 1;
$("p").each(function(){

    // now add a paragraph count in front of each of them.  Notice how we use the
    // $(this) variable to reference each of the paragraph elements individually.

    $(this).text(increment + ". " + $(this).text());
    increment++;
});
Since the search results are being stored in an array, you'd expect
functions to work through the array like you would any data object in any programming language.
Thus, to find the length of a given search result, you can call $().length on
the array. Further array traversal functions are as follows in Listing 11 and fit appropriately
with array traversal in other programming languages.
// the eq() function lets you reference an element in the array directly.
// In this case, it will get the 3rd paragraph (0 referenced of course) and hide it
$("p").eq(2).hide();

// The slice() function lets you input a start and an end index in the array, to
// create a subset of the array.  This will hide the 3rd through 5th paragraphs on the
// page
$("p").slice(2,5).hide();
In addition to these array traversal functions, jQuery
also offers functions that let you find elements nested right around
your search terms. Why might this be useful? Well,
oftentimes you want to embed a text label next to a picture,
or an error
message next to a form element. Using these commands lets
you search for a
specific form element and then
place an error message directly next to it by placing it in
the next element,
a span tag. Listing 12 is an example of this design:
function validateForm()
{
    $(".validate:text").each(function(){
    if ($(this).val()=="")
    //  We'll loop through each textfield on the page with a class of "validate"
    //  and if they are blank, we will put text in the  immediately afterwards
    //  with the error message.

        $(this).next().html("This field cannot be blank");
});
}
Bringing the
lessons all together
To see how all of these lessons come together, take a look at the demo
application included in this article. (See the Downloads section.)
A quick primer on the demo application is probably in
order here. I'll be using the demo application throughout the article
series, as it utilizes a number of different jQuery
examples, and is an application that nearly everyone is
familiar
with—a Rich Internet Application for Web mail! This demo
app is a simple mail client, utilizing jQuery to give
users the feeling of working with an e-mail client that
is actually a desktop application. By the end of the final article,
you'll see how the simple application creates that look and
feel for users, and ideally you'll see how easy it is to
create this with
jQuery.
This article focuses on the "Select All"/"Deselect All" check box that
appears at the top left column in Web mail tables (highlighted below). When this check box is selected, it
selects every check box in the column, and when it's deselected, it
deselects every check box in the column.
// remember that all jQuery setup code must be in this document.ready() function,
// or contained within its own function in order to function correctly.

$(document).ready(function(){
   // We use the jQuery selection syntax to find the selectall checkbox on the page
   // (note the '#' which signifies ID), and we tell jQuery to call the selectAll()
   // function every time someone clicks on the checkbox (we'll get to Events in a
   // future article).

   $("#selectall").click(selectAll);
});

// This function will get called every time someone clicks on the selectall checkbox
function selectAll()
{
    // this line determines if the selectall checkbox is checked or not.  The attr()
    // function, discussed in a future article, simply returns an attribute on the
    // given object.  In this case, it returns a boolean if true, or an undefined if
    // it's not checked.

    var checked = $("#selectall").attr("checked");

    // Now we use the jQuery selection syntax to find all the checkboxes on the page
    // with the selectable class added to them (each row's checkbox).  We get an array
    // of results back from this selection, and we can iterate through them using the
    // each() function, letting us work with each result one at a time.  Inside the
    // each() function, we can use the $(this) variable to reference each individual
    // result.  Thus, inside each loop, it finds the value of each checkbox and matches
    // it to the selectall checkbox.

    $(".selectable").each(function(){
       var subChecked = $(this).attr("checked");
       if (subChecked != checked)
          $(this).click();
    });
}
Conclusion
jQuery is becoming the preferred JavaScript library
in the Web application development community, and it likely will
continue to grow in importance as Rich Internet Applications become
more and more prevalent. As multiple companies migrate
their internal applications online, and as companies move their everyday
desktop applications online (including word
processors and spreadsheets), JavaScript libraries that
ease development and promise cross-platform support will become part of
the technology choice when an application is architected.
This first article in the series on jQuery introduced
you to the jQuery syntax, how to use jQuery correctly in your own
JavaScript code, and how to avoid any pitfalls when using it
with other libraries. Further, it introduced you to the
jQuery search and
selection syntax, from which all the other functionality
in jQuery is based. It allows you to find any page
element you want, simply and quickly, and take actions
on them. The article also showed you how to navigate through the
results from these searches, letting you take actions on the
elements individually. These two aspects of jQuery will
be the
fundamental basis on which the next articles in the
series will build and on which all of your jQuery code will be based.
Finally, the demonstration application was introduced, a rich client
Web mail application. In this article, you created the Select
All/Deselect All check box by using the jQuery you
learned in the article, and you saw that with only a few lines of code,
you could create a common widget seen in many Web sites.
The next article in the series will add some interactivity to our
sample Web application. You'll learn how to handle page events (clicking on elements, button clicks,
combobox choices, and so on), how to get values from elements on the page,
and how to alter the standard CSS on a page to change colors,
layouts, and so on, without having to reload the page.
In
his 13 years in technology, Michael Abernethy has worked with a wide
variety of technologies and a wide variety of clients. He currently
works as a freelance programmer specializing in Java high availability
and jQuery. His focus nowadays is on Rich Internet Applications and
making them both more complex and simpler at the same time. When he's
not working at his computer, he can be found on the golf course, or more
accurately in the bushes, looking for his ball.
jQuery is not a language but it is a well
written JavaScript code, As quoted on official jQuery website “it is a
fast and concise JavaScript Library that simplifies HTML document
traversing, event handling, animating, and Ajax interactions for rapid
web development“.
What is jQuery
jQuery is not a language but it is a well written JavaScript code, As
quoted on official jQuery website “it is a fast and concise JavaScript
Library that simplifies HTML document traversing, event handling,
animating, and Ajax interactions for rapid web development.“
In order to work with jQuery you should be aware of basics of JavaScript, HTML and CSS.
It was released in January 2006 at BarCamp NYC by John Resig. Licensing: It is free, open source software
Dual-licensed under the MIT License and the GNU General Public License.
Microsoft has integrated jQuery officially into its IDE Visual Studio
2010 and jQuery intellisense is available in Visual Studio 2010 now.
This is the first chapter of my jQuery ebook. Why jQuery
jQuery is very compact and well written JavaScript code that
increases the productivity of the developer by enabling them to achieve
critical UI functionality by writing very less amount of code.
It helps to
• Improve the performance of the application • Develop most browser compatible web page • Implement UI related critical functionality without writing hundreds of lines of codes • Fast • Extensible – jQuery can be extended to implement customized behavior
Other advantages of jQuery are
• No need to learn fresh new syntaxes to use jQuery, knowing simple JavaScript syntax is enough • Simple and Cleaner code, no need to write several lines of codes to achieve complex functionality.
Where to download jQuery from
jQuery javascript file can be downloaded from jQuery Official website http://www.jquery.com/
How to use jQuery
jQuery usually comes as a single JavaScript file containing
everything comes out of the box with jQuery. It can be included within a
web page using the following mark-up:
Ideally this markup is kept in under tag of
your web page, however you are free to keep anywhere you want.
Do I need to refer jQuery file both in Master page/base page/template page and content page
No, master page/base page/ template page basically helps to create
consistent layout for the page in the application. In case you have
referred the jQuery file in master page/base page/ template page that
cause rendering the file in the browser, you do not need to refer jQuery
file the content page again.
In summary, there should not be more than one